Horizontal Guidelines
Part Two
Continued from Blog Post #60...
Simple folds and creases create guidelines for the harmonious
symmetry pysanky are know for.

Begin by cutting a narrow (less than 1/4 inch) strip of paper (any thin, pliable paper works) about 11 inches long. The yellow strip of paper in this illustration creates the horizontal guidelines. Directions for vertical guidelines appear in Blog Post #60.

Gently rock the egg back and forth to crease the paper band.
Make a dark pencil line on both creases.

Turn the band over and make pencil lines in the creases. This helps with the next step.

Make a pencil line in the crease created by the fold. Add a small dot on
either side of the line to make it distinctive.

It divides the egg’s vertical circumference in half. Step #11 will show how it is used.
Next, refold the paper band.

Bend the horizontal-guide mark down to the aligned circumference
marks and evenly crease the resulting fold.

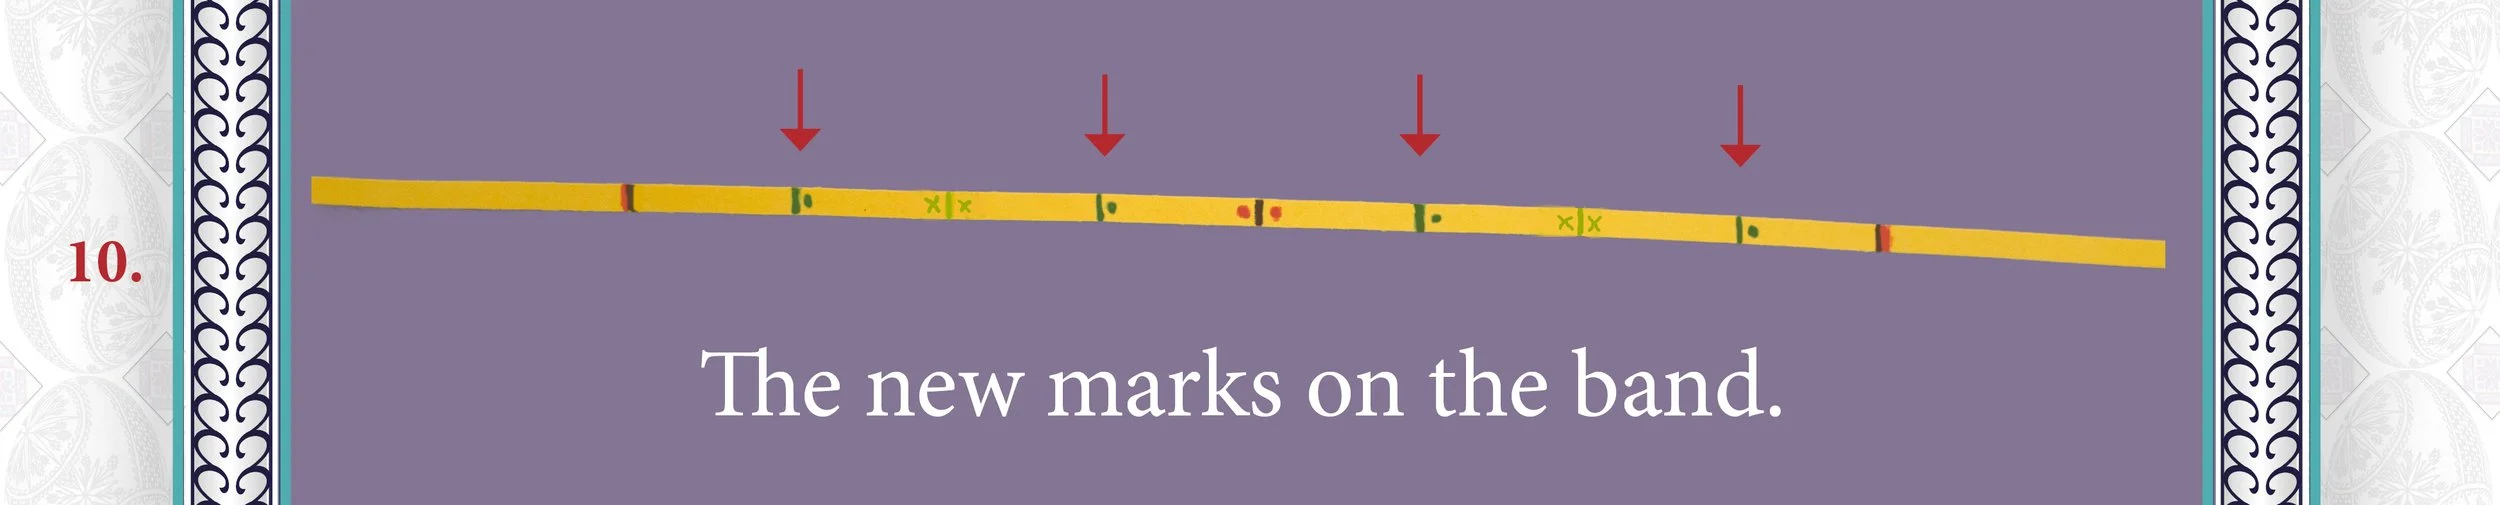
Make a pencil line in each new crease.

The new marks, indicated by arrows, will be used to horizontally divide the egg in half.
Next, refold the band to the 4th-mark position.

Bend the 4th-mark end down to meet the circumference mark. Evenly crease the fold.

Make a line in each of the four resulting creases.
transfering the Guideline marks to the egg.
With the guideline markings complete, hold the paper band tight against the egg, like in the first step, centered over one of the vertical pencil guideline. The horizontal-guide mark (the line between the two dots) should be at the top of the egg aligned with one of the vertical pencil guidelines. The circumference marks on the band align with the same vertical pencil line at the bottom of the egg.

You may find it easier to hold the band directly on the egg at the top and bottom, keeping the horizontal-guide mark and circumference mark securely in place, as shown in the illustration below. The dangling ends of the band remain behind the egg. The horizontal-guide mark and the circumference mark held in place, and the remaining three front-facing marks, are all that is necessary to complete the horizontal guideline divisions on the egg.
Extend the pencil line, on both the right and left sides of the band, onto the egg for
each of the three marks. Repeat this process for each remaining vertical line.

With the the horizontal-guide mark at the top and the circumference mark at the bottom, the band’s 4th-mark divides the egg in half around the middle and the two 8th-marks divides it further into four horizontal sections.

This final step completes the horizontal lines around the egg.
Additional Information
~ Check lines for accuracy and make adjustments if needed.
~ Eggs come in all sizes and shapes. This division technique simplifies it all.
~ The band’s mismatched ends are only for holding purposes and may be trimmed.
Vertical Guidelines Blog Post #60
The next post will show how this framework of guidelines help
position the design elements in a completed pysanka.
Prayer for world Peace
Divine Spirit,
Let Thy light and love manifest as peace in the hearts of all world leaders.
Let Thy light and love manifest as peace in the hearts of all people in all nations.
Let the joy of Divine love fill this world with peace and understanding.
Amen
Ukrainian folklore characterizes pysanky as a symbolic, talismanic writing that invokes a higher Universal Power for help, while believing with faithful certainty that It will. The contemporary version of this characterization is a paper-and-pen journaling practice called prayer writing. Both develop a personal relationship with God.
Copyright © 2023 Nancy Kopack.
All rights reserved.